
When Machines Learn to Read: DeepSeek OCR Explained

Are you also hearing this word “OCR“ a lot lately?
I mean, I’m. Mostly by a lot of AI influencers and researchers. There are a lot of good projects and snaps on X. But don’t worry, this story is going to clear all your doubts as well, and you will get hands-on experience.
Imagine this, you’ve got a stack of documents like receipts, old letters, and a blurry photo of a textbook page. You need the text on them. Manually retyping all that? Ugh, impossible task.
Now imagine if your computer could just read those images and spit out the text for you. That’s OCR (Optical Character Recognition). It’s like giving your computer a pair of reading glasses and a dip into puberty.
Optical Character Recognition OCR is the technology that turns pictures of text (typed, handwritten, or printed) into machine-encoded text. It lets a program read words on a page much like we do, except it does it pixel-by-pixel instead of letter-by-letter. Once an image is digitized, OCR can search, edit, translate, or speak the text. It’s the secret behind scanning passports at the airport, digitizing books for Project, reading out loud to the blind, and even cracking CAPTCHAs (let’s not make it mad at us).
At its core, OCR is a fusion of image processing and pattern recognition. Traditional image processing might focus on classifying images or detecting objects, whereas OCR specifically hunts for text characters within an image. You can think of it as Photoshop doing shape analysis plus a bit of language logic: it cleans the image up, finds the letters, and then maps those shapes to alphabet symbols.
In practice, OCR systems often use a pipeline of steps to work their magic.
How OCR Works: From Pixels to Text
Optical Character Recognition (OCR) converts images of text like scanned documents or photos into editable, searchable digital text. At a high level, OCR works in three stages: preprocessing, character recognition, and post-processing.
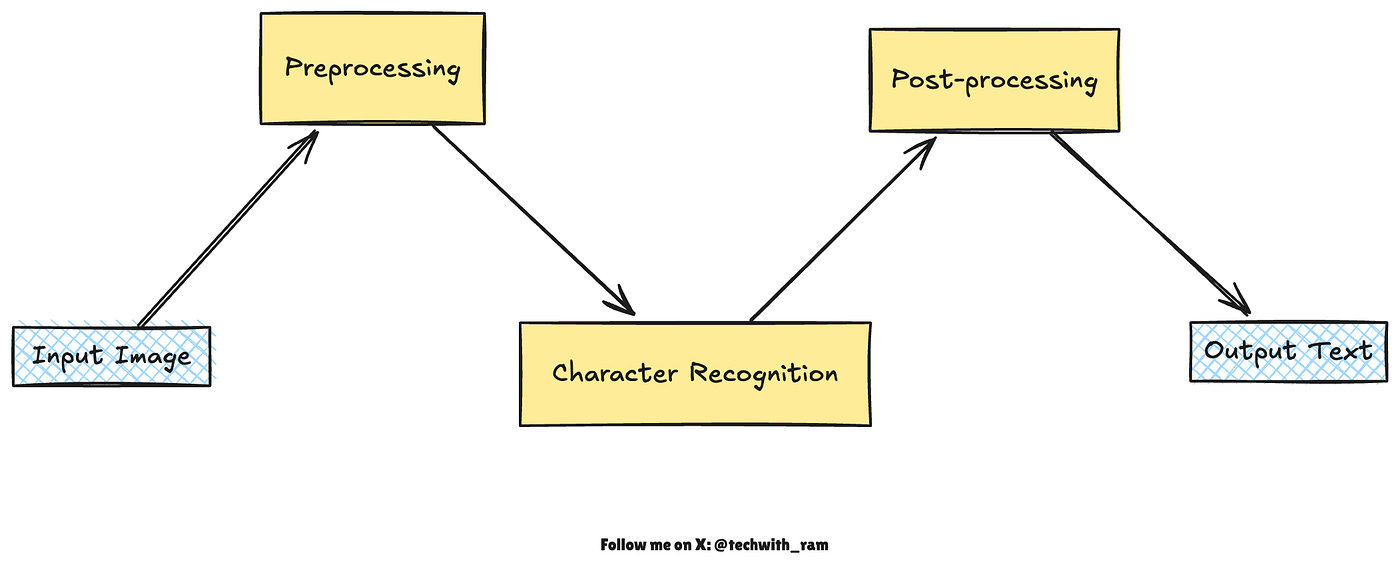
1. Preprocessing: {Cleaning and Preparing the Image}
Before recognition begins, the image is enhanced to make text easier to read by the OCR engine.
- Deskewing: Rotates the scanned page so text lines are perfectly horizontal.
- Binarization: Converts the image to black and white, separating text (foreground) from the background.
- Noise Removal: Eliminates smudges, dots, and other visual distortions.
- Layout Analysis: Detects columns, text zones, and segments lines into words, while isolating images or tables.
Think of this stage as “priming the canvas,” preparing a clean, structured image that clearly presents the letters for recognition.
2. Character Recognition: The Core of OCR
This is where the system identifies what each character actually is.
Matrix Matching (Template Matching): Early OCR systems compared each detected character pixel-by-pixel with a library of stored glyphs. If the scanned “A” matched the stored “A” pattern, the system output “A”. This worked for clean, typewritten text but struggled with variations in font, handwriting, or image quality.
Feature Extraction: To handle greater variability, more advanced systems analyze the geometric features of characters — such as lines, curves, intersections, and loops.
For example, an uppercase “A” might be described as two diagonal strokes meeting at the top, connected by a horizontal bar.
This abstract representation makes OCR more flexible across fonts and styles.
Neural Network–Based Recognition: Modern OCR engines use deep learning models trained on millions of text samples. These models learn to recognize entire words or text lines at once, analyzing patterns much like how humans learn to read handwriting.
For instance, open-source tools like Tesseract now employ neural networks to process full lines of text rather than individual characters, dramatically improving accuracy.
3. Post-processing: Refining and Correcting the Output
After initial recognition, OCR applies post-processing to improve accuracy and readability.
Dictionary & Spell Checking: Corrects misread words by comparing them against a language dictionary or lexicon.
Contextual Correction: Uses language models to fix improbable letter combinations based on word context.
Layout Preservation: Keeps track of word positions to recreate the original formatting.
Some OCR systems even output searchable PDFs or HTML documents by maintaining the text layout alongside the recognized words.
Traditional Image Processing vs. OCR
You might wonder: isn’t OCR just another image processing task?
In a way, it is. It uses image processing (to clean images and find characters). But OCR has a distinct goal: interpret symbols as language.
Traditional image processing might do things like smoothing, edge detection, or face recognition, which care about shapes or objects in general. OCR specifically cares about letter shapes and word patterns. It even taps into language knowledge (dictionaries, grammar) in post-processing. So while OCR sits under the umbrella of computer vision, it’s tailored toward textual content. You could say OCR is the semantics layer of image processing: it doesn’t just see pixels, it reads them.
The rise of AI has blurred these lines. Modern OCR is often done by vision-language models (VLMs) that combine image encoders with language models. These AI-driven systems perform end-to-end OCR, sometimes even understanding layout (tables, figures, and multi-column text). We’ll see this next.
Advancements in OCR: Enter AI and DeepSeek
OCR has come a long way thanks to deep learning. Early OCR was rule-based or simple neural nets. Today’s systems use convolutional neural networks (CNNs), transformers, and massive image-text models. For example, Google’s Vision API or open-source tools like EasyOCR, PaddleOCR, and Tesseract’s latest versions all rely on deep networks trained on huge datasets. They can handle diverse fonts, lighting conditions, and even non-Latin scripts with impressive accuracy.
One exciting trend is Vision-Language Models (VLMs). These are AI models trained on both images and text, enabling them not only to recognize characters but also to understand documents as a whole. Projects like Qwen-VL, InternVL, and OCR2.0 have shown that a single model can both detect text regions and recognize the text all in one pass.
And then there’s DeepSeek OCR — a very hot new entry. DeepSeek OCR isn’t just about reading text better; it’s about a whole new vision of context processing. Traditional OCR (and most VLMs) treats text as long chains of tokens. DeepSeek says: “Hey, what if we see the text instead of reading it token by token?” It introduces Context Optical Compression: converting lengthy text into a compact visual form that an AI can digest faster. In practice, DeepSeek paints pages of text into images and uses a specialized encoder to compress them into “vision tokens.” Each visual token can carry much more information (font, layout, context) than a regular text token.

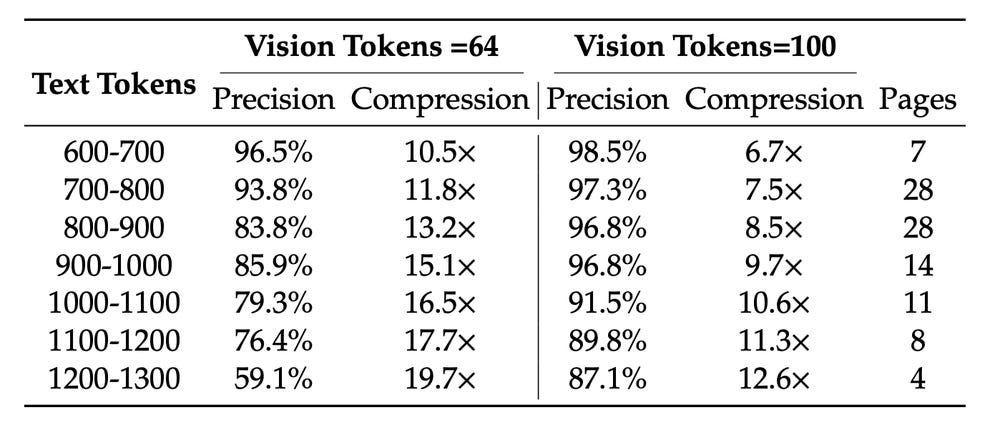
In simpler terms: imagine a 10,000-word document. A normal language model processes 10,000 tokens. DeepSeek’s approach might encode that into just ~1,000 visual tokens — a 10× compression! Remarkably, it can still output text at ~97% accuracy on standard benchmarks when compressed by 10×. Even at 20× (really crushing it down), it’s about 60% accurate — still useful for many tasks. This means faster inference with fewer computational steps. As one researcher put it, DeepSeek asks “are pixels better inputs to LLMs than text?”
DeepSeek isn’t a replacement for traditional image filters — it is image processing (it uses a CNN-based encoder) — but its goal is different. It’s designing an encoder so that a vision transformer can capture text information ultra-efficiently. The result is state-of-the-art OCR and document parsing with far fewer tokens needed.
Let’s zoom into the DeepSeek architecture, because it’s pretty cool.
DeepSeek OCR Architecture
DeepSeek OCR uses a two-part architecture: a DeepEncoder and a DeepSeek-3B-MoE Decoder. Think of the DeepEncoder as the “vision compression engine” and the decoder as a language model that spells out the text.
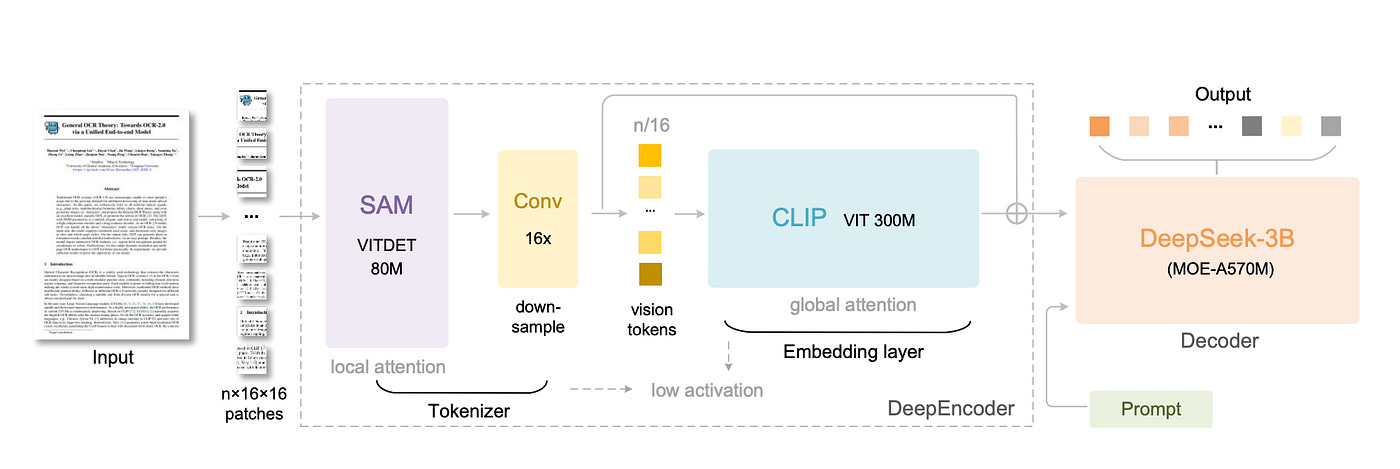
DeepEncoder: This is a custom image encoder with about 380M parameters. It’s built from two known pieces and a clever bridge. First, a SAM-based model (80M params) with windowed attention handles local visual details. Second, a CLIP-Large model (300M params) handles global context with full attention. Connecting them is a 16× Token Compressor (a stack of convolutions) that squashes thousands of patch tokens into just a few hundred “vision tokens.”
The result?
Even a 1024×1024 document turns into maybe a few hundred tokens, not millions. This keeps memory use low and speeds up processing.
DeepSeek-3B-MoE Decoder: Once the image is compressed into visual tokens, a transformer decoder (similar to a GPT) turns those tokens into text. DeepSeek uses a Mixture of Experts (MoE) design. At inference, only a small subset of the total “experts” are active (6 out of 64 plus 2 shared ones), giving it the power of a 3 billion parameter model but with the compute cost of a ~600M model. This decoder takes the vision tokens and the initial prompt (like “Convert the document to markdown”) and generates the textual output.
According to the creators, this design achieves incredible efficiency. On the standard OmniDocBench for documents, DeepSeek-OCR outperforms previous OCR models while using far fewer tokens. In practical terms, a single A100 GPU can process over 200,000 pages per day with DeepSeek. It’s a heavy-duty setup, but it shows that OCR can scale up massively.
DeepSeek also handles not just plain text but complex elements: tables, charts, chemical formulas, and diagrams—because it’s essentially an end-to-end document parser.
In short, it’s pushing OCR from just reading letters to understanding documents visually and semantically.
Hands-On with DeepSeek OCR
Enough theory!
Let’s do a quick project! We’ll use the open-source DeepSeek-OCR model to convert an image of text into actual text. We’ll walk through installing DeepSeek, loading an image, running the model, and getting the result.
Installation and Setup
DeepSeek-OCR is available on GitHub and Hugging Face, and it requires a recent Python environment (tested on Python 3.12 with CUDA 11.8). Here’s a simplified setup (you’ll need a decent GPU for reasonable speed):
# Clone the repository
git clone https://github.com/deepseek-ai/DeepSeek-OCR.git
cd DeepSeek-OCR

# Create a new environment (e.g., with conda or venv)
conda create -n deepseek-ocr python=3.12 -y
conda activate deepseek-ocr

# Install PyTorch (v2.6) with CUDA 11.8 support
pip install torch==2.6.0 torchvision==0.21.0 torchaudio==2.6.0 \
 - index-url https://download.pytorch.org/whl/cu118

# (Optional) If using vLLM tools: install the wheel
# pip install vllm-0.8.5+cu118-cp38-abi3-manylinux1_x86_64.whl
# Install Python requirements
pip install -r requirements.txt

# Install flash-attn for faster inference
pip install flash-attn==2.7.3
Alternatively, if you just want to use the model via Hugging Face Transformers, you can skip some repo steps and just install transformers, torch, tokenizers, etc, as shown below.
Model Overview
DeepSeek-OCR is a vision-language model. Under the hood it’s packaged as a Hugging Face Transformers model with custom code. You don’t need to implement the architecture yourself, you just load it by name. However, remember it’s large, so load it on a GPU.
Let’s load the model and its tokenizer in Python:
from transformers import AutoModel, AutoTokenizer
import torch

model_name = “deepseek-ai/DeepSeek-OCR”
tokenizer = AutoTokenizer.from_pretrained(model_name, trust_remote_code=True)
model = AutoModel.from_pretrained(
    model_name,
    trust_remote_code=True,
    _attn_implementation=’flash_attention_2’,
    use_safetensors=True
)
model = model.eval().cuda().to(torch.bfloat16)
Here we can use trust_remote_code=True because DeepSeek provides custom model code. We also move the model to GPU and use bfloat16 for speed (supported on recent GPUs)
Loading and Preprocessing the Image
DeepSeek-OCR’s inference API expects an image file. You can use JPEGs, PNGs, etc.
Let’s say we have a scanned document document.jpg. We can simply give the file path to the model. (Under the hood, it will use Python Imaging Library to open it.)
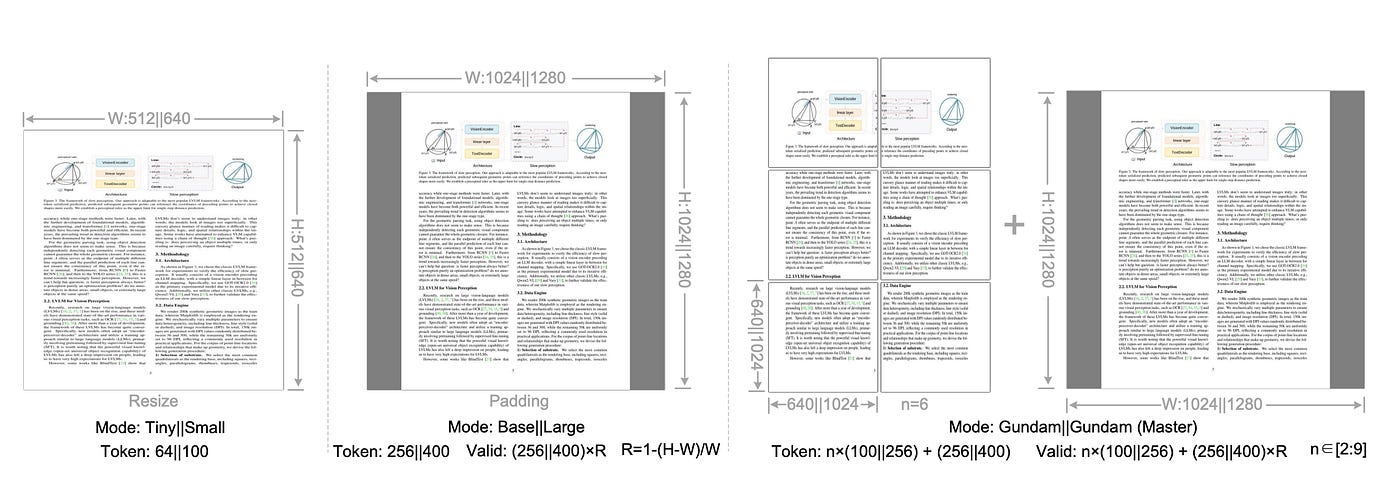
If you need to manipulate the image (deskew, crop, etc.), you could do that with OpenCV or PIL beforehand, but DeepSeek will handle splitting large images. Its default mode is to use a “base_size” of 1024 and an “image_size” of 640, with crop_mode=True – this means it will take 1024×1024 crops of the page and also 640×640 crops, covering the whole document.
You could adjust these parameters for different performance/accuracy trade-offs (the README notes tiny/small/base/large modes).
For simplicity, let’s just feed the image path:
image_path = “path/to/document.jpg”Running Inference
Now we define a prompt and run the model.
DeepSeek uses special tokens to indicate image input. A common trick is to use the <|grounding|> token with a query like “Convert the document to markdown.” You can also use “<image>\nFree OCR.” for plain text output. Here’s an example:
prompt = “<image>\n<|grounding|>Convert the document to markdown.”
res = model.infer(
    tokenizer,
    prompt=prompt,
    image_file=image_path,
    output_path=”ocr_output”,
    base_size=1024,
    image_size=640,
    crop_mode=True,
    save_results=True
)
This runs the OCR. Behind the scenes, DeepSeek’s encoder compresses the image, then the decoder generates text. If save_results=True, it will write output files (by default Markdown and image PNGs) into the directory ocr_output. The res object also contains information. For example, res[’text’] will have the recognized text. (You can omit output_path and save_results if you just want the Python return value.)
After calling model.infer, you might print or examine the result:
print(res[’text’][:200]) # print the first 200 charactersYou should see text that closely matches the contents of your scanned page, possibly with Markdown formatting (headers, bullet points) if you used the Markdown prompt.
The deepseek-ai model card on Hugging Face shows very similar code examples, confirming this usage
Post-Processing and Exporting Results
Once you have the text, you can clean it up or export it. For example, write it to a file:
with open(”recognized_text.md”, “w”) as f:
    f.write(res[’text’])
Because we asked for Markdown, the output may contain # for headings, lists, or even images if they were in the document. You can also post-process to plain text if needed (strip extra markup or fix hyphenation). OCR isn’t perfect: you might see minor errors or formatting issues, especially on low-quality scans or odd layouts. Common fixes include spell-checking, using a vocabulary to correct misrecognized words, or manual review.
DeepSeek-OCR even provides vocabulary/”whitelist” options in advanced use (see the code samples using SamplingParams in the GitHub repo). But for many uses, a simple clean save is enough.
Finally, you can use the text however you need: index it in a search engine, feed it to another AI, or just read it on the screen. For instance, you could do:
print(”### Extracted Text:\n\n” + res[’text’])Implement Deepseek-OCR Paper:
This below is the project structure of the research paper implementation in smaller level. You can check out my github repo here:
Deepseek-OCR/
├── configs/ # Model and mode configurations
│ ├── model.yaml
│ └── modes.yaml
├── models/ # Model implementations
│ ├── deepencoder/
│ │ ├── sam_stage.py # Window attention stage
│ │ ├── compressor.py # 16× token compressor
│ │ ├── clip_stage.py # Global attention stage
│ │ └── deepencoder.py # Full encoder
│ ├── decoders/
│ │ ├── lm_decoder.py # LM decoder
│ │ └── moe_layers.py # MoE (optional)
│ └── ocr_model.py # End-to-end model
├── utils/ # Utilities
│ ├── image_io.py # Image loading & preprocessing
│ ├── metrics.py # CER, WER metrics
│ ├── prompts.py # OCR prompts
│ └── …
├── scripts/ # Training & inference
│ ├── infer.py
│ ├── train_encoder.py
│ └── train_ocr.py
├── evaluation/ # Evaluation scripts
│ ├── evaluate_ocr.py
│ └── baselines/
│ ├── tesseract_eval.py
│ └── paddle_eval.py
├── demo/ # Demo application
│ └── app.py
├── data/ # Data directory
└── docs/ # Documentation
└── ARCHITECTURE.md
Remember, I remove my dataset from opensource. Your work is to:
Add training data and run Stage 1 + 2 training
Test on sample images using the inference script
Evaluate against Tesseract/PaddleOCR baselines
Launch demo with
python demo/app.pyScale up by upgrading to larger backbones (Swin-B, CLIP-L, LLaMA)
Any help, just comment here. All the best for implementation of this.
 | A guest post by
|